UltraBorg - Precision servo control with ultrasonic module support
Installation
Images on this page may be clicked on to get a higher resolution and quality version.Mounting
Two basic mounting options are provided:The First option is to mount the board on top of a Rev 2 Raspberry Pi using the central mounting hole by positioning the board over the Raspberry Pi's mounting hole (the one closest to the HDMI connector), the board can be oriented however you choose.
The Second option is to mount the board using any combination of the three available mounting holes to part of the robot you are building, we recommend using all three if possible.
If stacking multiple boards using the mounting hole you will need to ensure the posts used provide enough clearance between boards so they cannot touch, if they are too close it may cause problems.
Connections
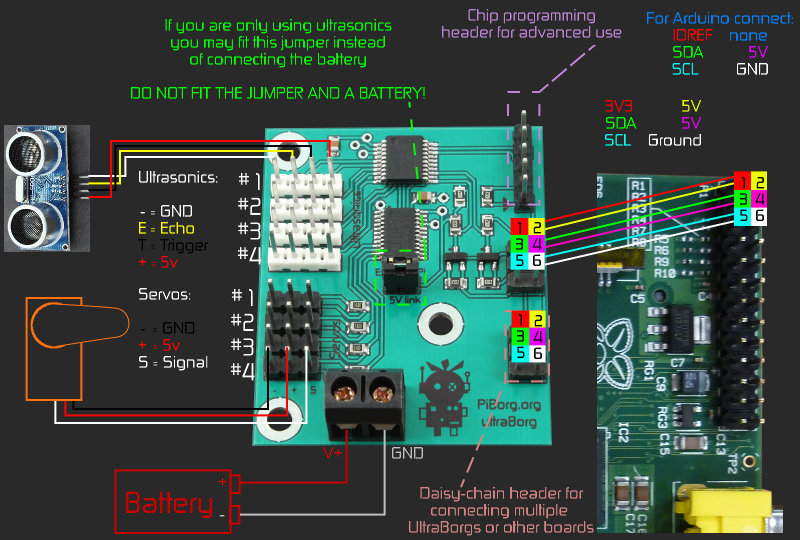
Here are all of the connections on the UltraBorg:
We will go through each type of connection separately below.
The first thing will be to connect the UltraBorg to your robot brain.
Raspberry Pi
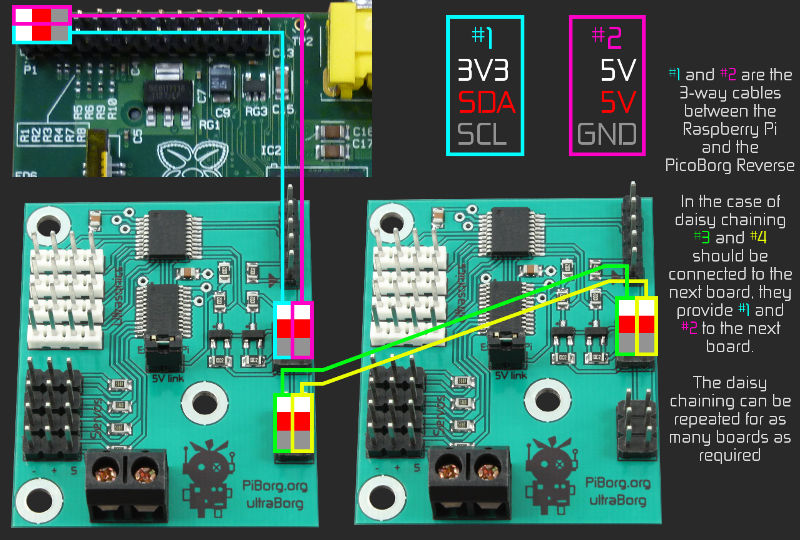
Connect the six-pin header used for talking with the Raspberry Pi to the Raspberry Pi GPIO header as shown below.The outlines show an individual 3x1 pin cable (two supplied), the coloured boxes show the colour of the wire (grey is used instead of black in the diagram).

As you can see you may connect multiple boards at once, read further down for instructions on configuring the software correctly to run with multiple boards attached.
Arduino
You only need to connect five pins to your Arduino to use UltraBorg.These are IOREF (pin 1), SDA (pin 3), SCL (pin 5), 5V (pin 4), GND (pin 6).
SCL and SDA are on different pins for different Arduinos:
| Arduino | SDA | SCL |
|---|---|---|
| Uno | A4 | A5 |
| Ethernet | A4 | A5 |
| Mega2560 | 20 | 21 |
| Leonardo | 2 | 3 |
| Due | SDA1 | SCL1 |
Read further down for instructions on configuring the software correctly to run with multiple boards attached.
Power
There are two options for power connection:- Connect a battery or 5v supply to the 2-pin screw terminal
- If you are only using ultrasonics fit the 5V link jumper instead
Be careful to connect the battery the correct way around, fitting it backwards may damage servos or ultrasonic modules.
Servo motors
You may connect up to four servo motors to a single UltraBorg.The servos connect on to the black 3-pin connectors shown above.
Make sure the connections match the UltraBorg correctly, not all servo manufacturers use the same colours or names.
- is known as -, -ve, 0v, GND, or ground. Often coloured black or brown.+ is known as +, +ve, 5v, Vcc, or power. Usually coloured red.S is known as S, signal, data, PWM, or position. Often coloured white or orange.Consult your servo instructions to be safe.
Ultrasonic modules
UltraBorg is designed to work with the 4-pin HC-SR04 ultrasonic modules.You may connect up to four ultrasonic modules to a single UltraBorg.
The ultrasonic modules connect on to the white 4-pin connectors shown above.
Make sure the connections match the UltraBorg correctly, connecting them incorrectly can damage the module
- is known as Gnd, on our 4-pin cables we use the white wire for this.E is known as Echo, on our 4-pin cables we use the yellow wire for this.T is known as Trig, on our 4-pin cables we use the black wire for this.+ is known as Vcc, on our 4-pin cables we use the red wire for this.Software
Raspberry Pi
Please note that this installation expects you to be connected to the internet, it will download i2c-tools and python-smbus for using I²C from Python, as well as tix for the tuning GUI.You may need to enable I2C first, to do this:
- Enter the following command in a terminal:
sudo raspi-config - Move down to option
8 Advanced Optionsand press ENTER - Move down to option
A7 I2Cand press ENTER - Make sure
Yesis highlighted and press ENTER - When the dialog says I2C is enabled press ENTER
- Make sure
Yesis highlighted again and press ENTER - When the dialog says I2C will be loaded by default press ENTER
- Move right until
Finishis highlighted, then press ENTER
To run through the automatic installer just use this one line in a terminal:
bash <(curl https://www.piborg.org/install-ultraborg.txt)If you would prefer to manually run through the steps use the commands below:
mkdir ~/ultraborg
cd ~/ultraborg
wget http://www.piborg.org/downloads/ultraborg/examples.zip
unzip examples.zip
chmod +x install.sh
./install.sh
Manual download: http://www.piborg.org/downloads/ultraborg/examples.zip
At the end of the install two desktop icons will appear for the example GUI and the tuning GUI, you should now be ready to go.
Arduino
To get started first download the zip file: UltraBorg Arduino library and example sketchUnzip the file to get the two provided sketches:
UltraBorgArduino - A simple example of using the UltraBorg.UltraBorgTuning - A serial based example which allows you to tune the servo ranges.The
UltraBorgArduino example sketch contains the following:UltraBorgTuning.ino- The example script which moves all the servos in a sequenceUltraBorg.h- The header for the UltraBorg libraryUltraBorg.cpp- The UltraBorg library code itself
Wire library, so any sketches using it should call Wire.begin(); before using the library, ideally in void setup().Multiple Boards
In order to setup multiple boards there is an additional step, we need to give each board a unique address.The allowable addresses are 3 (
0x03) to 119 (0x77), the numbers in parenthesis are in hexadecimal.The first task is to pick a unique number for each board, for this example we will have three boards which we will number 10, 11, and 12.
Raspberry Pi
Start the Raspberry Pi with the first boardOpen a terminal and start a Python prompt as follows:
cd ~/ultraborgpythonLoad the library
import UltraBorgSet the address of the attached board, the function should tell you if this is successful or not
UltraBorg.SetNewAddress(10)Disconnect the attached board and connect the next board, you can do this with the Raspberry Pi still running if careful, if you are worried shut the Raspberry Pi down first, then repeat the steps up to and including loading the library.
Set the address of the attached board, repeat the last two steps for each board.
UltraBorg.SetNewAddress(11)UltraBorg.SetNewAddress(12)Finally attach all of the boards at once, then run the following to see what addresses were found:
print UltraBorg.ScanForUltraBorg()If everything went well the last line should show the numbers you set, e.g.
[10 11 12]You can now use them all in a script like so
# Setup the library ready for use
import UltraBorg
# Board #1, address 10
UB1 = UltraBorg.UltraBorg()
UB1.i2cAddress = 10
UB1.Init()
# Board #2, address 11
UB2 = UltraBorg.UltraBorg()
UB2.i2cAddress = 11
UB2.Init()
# Board #3, address 12
UB3 = UltraBorg.UltraBorg()
UB3.i2cAddress = 12
UB3.Init()
Simply use
UB1, UB2, or UB3 anywhere you would have used UB in a single board example.You can use as many boards as there are free address numbers, over a hundred in all ^_^
For more detailed instructions or help see Setting up multiple UltraBorgs on the forum.
Arduino
To start make a new sketch, copy over theUltraBorg.c and UltraBorg.h into the same folder.Paste the following code into the
.ino file:
#include <Wire.h>               // The I2C library
#include "UltraBorg.h"          // The UltraBorg library

void setup()
{
    Wire.begin();               // Join the I2C bus (we will be acting as master)
    Serial.begin(9600);         // open the serial port at 9600 bps
}

void loop()
{
    int address;

    Ubi2cAddress = UbScanForAddress(0);
    UbInit();
    Serial.print("Current I2C address: ");
    Serial.println(Ubi2cAddress);

    Serial.println("Address to use ?");
    while (Serial.available() == 0) delay(100);
    address = Serial.parseInt();

    UbSetNewAddress(address);
    address = UbScanForAddress(0);
}
Upload the sketch, then open the serial monitor.The script should report the current I2C address, the default is 54 (0x36).
Type in our new number, then press ENTER. If it worked the I2C address should now be the new number.
Disconnect the first UltraBorg, then connect the next one.
Press the reset button to get the Arduino to rescan the I2C bus.
Set this UltraBorg to the next number.
Repeat until they are all set.
If we have three boards set to 10, 11, and 12 we can talk to them like this:
#include <Wire.h>               // The I2C library
#include "UltraBorg.h"          // The UltraBorg library

void setup()
{
    Wire.begin();               // Join the I2C bus (we will be acting as master)
    Serial.begin(9600);         // open the serial port at 9600 bps
}

void loop()
{
    int address;

    Ubi2cAddress = 10;
    UbInit();

    Ubi2cAddress = 10;
    Serial.println("Distances board #1");
    Serial.println(UbGetDistance1());
    Serial.println(UbGetDistance2());
    Serial.println(UbGetDistance3());
    Serial.println(UbGetDistance4());

    Ubi2cAddress = 11;
    Serial.println("Distances board #2");
    Serial.println(UbGetDistance1());
    Serial.println(UbGetDistance2());
    Serial.println(UbGetDistance3());
    Serial.println(UbGetDistance4());

    Ubi2cAddress = 12;
    Serial.println("Distances board #3");
    Serial.println(UbGetDistance1());
    Serial.println(UbGetDistance2());
    Serial.println(UbGetDistance3());
    Serial.println(UbGetDistance4());
}
General Usage - Raspberry Pi
Example GUI

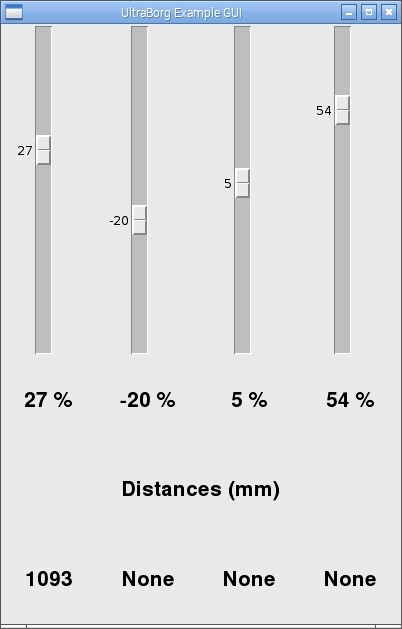
The example GUI provides a simple way of checking the servos and ultrasonic modules are working correctly.
The distance readings are filtered by the UltraBorg, the library provides access to both filtered and unfiltered distances.
You may notice that the servos are not able to use their whole range.
This can be corrected using the tuning GUI shown below.
Tuning GUI

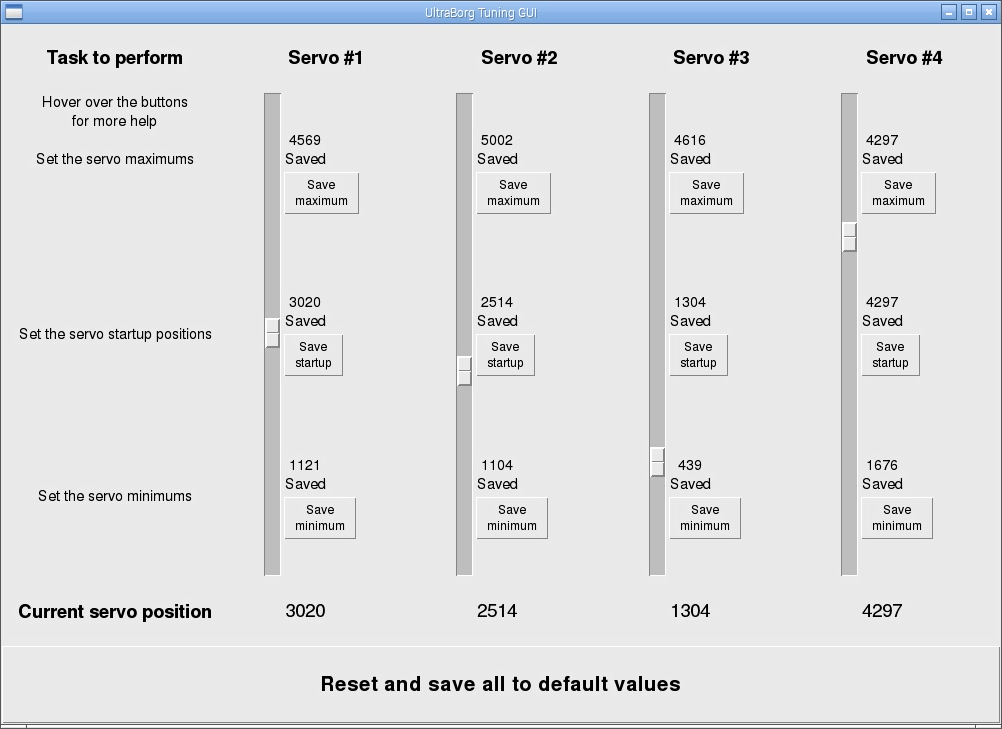
The tuning GUI allows you to configure the range of movement for each servo attached to UltraBorg.
Not all servos use the same range of input, so to be safe UltraBorg uses a small range by default.
The tuning GUI allows you to configure three things for each servo:
- The minimum allowed position
- The maximum allowed position
- The position to start at when powered
See the UltraBorg tuning instructions for more detail on tuning your servos.
Other Examples
The following scripts may be run from the UltraBorg install folder (cd ~/ultraborg):./ubReadDistances.py - Displays the ultrasonic distance readings./ubSequence.py - Moves all four servos at different speeds./ubServoFromDistances.py - Moves each servo based on the unfiltered ultrasonic readingsFor more information or setup help see the full example details here.
Python Library
The example scripts make use of our Python library,UltraBorg.py, to command the board.Filtered readings update slower then the unfiltered versions, but they are less noisy / jumpy.
The library exposes all of the features of the board with the following functions:
# Setup the library ready for use
import UltraBorg                        # Load the library
UB = UltraBorg.UltraBorg()              # Create a board object
UB.Init()                               # Setup the board

# Moving servos
UB.SetServoPosition1(position)          # Set the current position of servo #1
UB.SetServoPosition2(position)          # Set the current position of servo #2
UB.SetServoPosition3(position)          # Set the current position of servo #3
UB.SetServoPosition4(position)          # Set the current position of servo #4

# Reading the servo positions
UB.GetServoPosition1()                  # Read the current position of servo #1
UB.GetServoPosition2()                  # Read the current position of servo #2
UB.GetServoPosition3()                  # Read the current position of servo #3
UB.GetServoPosition4()                  # Read the current position of servo #4

# Reading distances
UB.GetDistance1()                       # Read the filtered distance from ultrasonic module #1
UB.GetDistance2()                       # Read the filtered distance from ultrasonic module #2
UB.GetDistance3()                       # Read the filtered distance from ultrasonic module #3
UB.GetDistance4()                       # Read the filtered distance from ultrasonic module #4
UB.GetRawDistance1()                    # Read the unfiltered distance from ultrasonic module #1
UB.GetRawDistance2()                    # Read the unfiltered distance from ultrasonic module #2
UB.GetRawDistance3()                    # Read the unfiltered distance from ultrasonic module #3
UB.GetRawDistance4()                    # Read the unfiltered distance from ultrasonic module #4

# Reading the servo limits
UB.GetServoMinimum1()                   # Read the minimum burst for servo #1 (divide by 2 for us)
UB.GetServoMaximum1()                   # Read the maximum burst for servo #1 (divide by 2 for us)
UB.GetServoMinimum2()                   # Read the minimum burst for servo #2 (divide by 2 for us)
UB.GetServoMaximum2()                   # Read the maximum burst for servo #2 (divide by 2 for us)
UB.GetServoMinimum3()                   # Read the minimum burst for servo #3 (divide by 2 for us)
UB.GetServoMaximum3()                   # Read the maximum burst for servo #3 (divide by 2 for us)
UB.GetServoMinimum4()                   # Read the minimum burst for servo #4 (divide by 2 for us)
UB.GetServoMaximum4()                   # Read the maximum burst for servo #4 (divide by 2 for us)

# Reading the servo startup positions
UB.GetServoStartup1()                   # Read the servo #1 startup burst (divide by 2 for us)
UB.GetServoStartup2()                   # Read the servo #2 startup burst (divide by 2 for us)
UB.GetServoStartup3()                   # Read the servo #3 startup burst (divide by 2 for us)
UB.GetServoStartup4()                   # Read the servo #4 startup burst (divide by 2 for us)

# Set the servo limits (we recommend doing this using the tuning GUI)
UB.SetServoMinimum1(pwmLevel)           # Sets the minimum burst size for servo #1 to pwmLevel / 2 us
UB.SetServoMaximum1(pwmLevel)           # Sets the maximum burst size for servo #1 to pwmLevel / 2 us
UB.SetServoMinimum2(pwmLevel)           # Sets the minimum burst size for servo #2 to pwmLevel / 2 us
UB.SetServoMaximum2(pwmLevel)           # Sets the maximum burst size for servo #2 to pwmLevel / 2 us
UB.SetServoMinimum3(pwmLevel)           # Sets the minimum burst size for servo #3 to pwmLevel / 2 us
UB.SetServoMaximum3(pwmLevel)           # Sets the maximum burst size for servo #3 to pwmLevel / 2 us
UB.SetServoMinimum4(pwmLevel)           # Sets the minimum burst size for servo #4 to pwmLevel / 2 us
UB.SetServoMaximum4(pwmLevel)           # Sets the maximum burst size for servo #4 to pwmLevel / 2 us

# Set the servo startup positions (we recommend doing this using the tuning GUI)
UB.SetServoStartup1(pwmLevel)           # Sets the startup burst size for servo #1 to pwmLevel / 2 us
UB.SetServoStartup2(pwmLevel)           # Sets the startup burst size for servo #2 to pwmLevel / 2 us
UB.SetServoStartup3(pwmLevel)           # Sets the startup burst size for servo #3 to pwmLevel / 2 us
UB.SetServoStartup4(pwmLevel)           # Sets the startup burst size for servo #4 to pwmLevel / 2 us

# Set the servo output to a specific burst time (we do not recommend doing this, it ignores set limits!)
UB.CalibrateServoPosition1(pwmLevel)    # Sets the PWM burst size for servo #1 to pwmLevel / 2 us
UB.CalibrateServoPosition2(pwmLevel)    # Sets the PWM burst size for servo #2 to pwmLevel / 2 us
UB.CalibrateServoPosition3(pwmLevel)    # Sets the PWM burst size for servo #3 to pwmLevel / 2 us
UB.CalibrateServoPosition4(pwmLevel)    # Sets the PWM burst size for servo #4 to pwmLevel / 2 us

# Get the current servo output burst time
UB.GetRawServoPosition1()               # Reads the current burst for servo #1 (divide by 2 for us)
UB.GetRawServoPosition2()               # Reads the current burst for servo #2 (divide by 2 for us)
UB.GetRawServoPosition3()               # Reads the current burst for servo #3 (divide by 2 for us)
UB.GetRawServoPosition4()               # Reads the current burst for servo #4 (divide by 2 for us)

# Setting parameters (before Init)
UB.i2cAddress = address                 # Set the address of the board to use
UB.printFunction = function             # Re-route / disable diagnostic messages

# Reading parameters (after Init)
print UB.busNumber                      # Shows which I²C bus the board is connected on
print UB.foundChip                      # See if the board is found / not found

# Other functions
UltraBorg.ScanForUltraBorg()            # Sweep the I²C bus for available boards
UltraBorg.SetNewAddress(address)        # Configure the attached board with a new address
UB.Help()                               # Get help on the available functions
For more complete details see the UltraBorg library reference.
To see the source code for the library or any of the examples see the code listings here.
General Usage - Ardunio
To get started openUltraBorgArduino.ino in the Arduino IDE with the UltraBorg and any servos / ultrasonics you wish to use attached.Upload the sketch to the Arduino, the servos should begin moving in a repeating pattern.
To check the ultrasonics are working open the serial monitor and press the reset button.
Any attached ultrasonics should report a filtered position when the Arduino is reset.
If you wish to make your own sketch copy the library files into your sketch:
UltraBorg.h and UltraBorg.cpp.You will need to include the following libraries in your code:
// Import library headers
#include <Wire.h>                       // Load the I2C library
#include "UltraBorg.h"                  // Load the library
Before using the library make sure both of the above have been setup using these calls:
// Setup the libraries ready for use
Wire.begin();                           // Join the I2C bus (we will be acting as master)
UbInit()                                // Setup the board
You can then operate UltraBorg using the functions listed below.
You may notice that the servos are not able to use their whole range.
This can be corrected using the UltraBorgTuning example sketch.
Arduino Library
The example sketches make use of our Arduino library,UltraBorg.h, to command the board.Filtered readings update slower then the unfiltered versions, but they are less noisy / jumpy.
The library exposes all of the features of the board with the following functions:
// Setup the library ready for use
#include <Wire.h>                       // Load the I2C library
#include "UltraBorg.h"                  // Load the library
Wire.begin();                           // Join the I2C bus (we will be acting as master)
UbInit()                                // Setup the board

// Moving servos
UbSetServoPosition1(position)           // Set the current position of servo #1
UbSetServoPosition2(position)           // Set the current position of servo #2
UbSetServoPosition3(position)           // Set the current position of servo #3
UbSetServoPosition4(position)           // Set the current position of servo #4

// Reading the servo positions
UbGetServoPosition1()                   // Read the current position of servo #1
UbGetServoPosition2()                   // Read the current position of servo #2
UbGetServoPosition3()                   // Read the current position of servo #3
UbGetServoPosition4()                   // Read the current position of servo #4

// Reading distances
UbGetDistance1()                        // Read the filtered distance from ultrasonic module #1
UbGetDistance2()                        // Read the filtered distance from ultrasonic module #2
UbGetDistance3()                        // Read the filtered distance from ultrasonic module #3
UbGetDistance4()                        // Read the filtered distance from ultrasonic module #4
UbGetRawDistance1()                     // Read the unfiltered distance from ultrasonic module #1
UbGetRawDistance2()                     // Read the unfiltered distance from ultrasonic module #2
UbGetRawDistance3()                     // Read the unfiltered distance from ultrasonic module #3
UbGetRawDistance4()                     // Read the unfiltered distance from ultrasonic module #4

// Reading the servo limits
UbGetServoMinimum1()                    // Read the minimum burst for servo #1 (divide by 2 for us)
UbGetServoMaximum1()                    // Read the maximum burst for servo #1 (divide by 2 for us)
UbGetServoMinimum2()                    // Read the minimum burst for servo #2 (divide by 2 for us)
UbGetServoMaximum2()                    // Read the maximum burst for servo #2 (divide by 2 for us)
UbGetServoMinimum3()                    // Read the minimum burst for servo #3 (divide by 2 for us)
UbGetServoMaximum3()                    // Read the maximum burst for servo #3 (divide by 2 for us)
UbGetServoMinimum4()                    // Read the minimum burst for servo #4 (divide by 2 for us)
UbGetServoMaximum4()                    // Read the maximum burst for servo #4 (divide by 2 for us)

// Reading the servo startup positions
UbGetServoStartup1()                    // Read the servo #1 startup burst (divide by 2 for us)
UbGetServoStartup2()                    // Read the servo #2 startup burst (divide by 2 for us)
UbGetServoStartup3()                    // Read the servo #3 startup burst (divide by 2 for us)
UbGetServoStartup4()                    // Read the servo #4 startup burst (divide by 2 for us)

// Set the servo limits (we recommend doing this using the tuning GUI)
UbSetServoMinimum1(pwmLevel)            // Sets the minimum burst size for servo #1 to pwmLevel / 2 us
UbSetServoMaximum1(pwmLevel)            // Sets the maximum burst size for servo #1 to pwmLevel / 2 us
UbSetServoMinimum2(pwmLevel)            // Sets the minimum burst size for servo #2 to pwmLevel / 2 us
UbSetServoMaximum2(pwmLevel)            // Sets the maximum burst size for servo #2 to pwmLevel / 2 us
UbSetServoMinimum3(pwmLevel)            // Sets the minimum burst size for servo #3 to pwmLevel / 2 us
UbSetServoMaximum3(pwmLevel)            // Sets the maximum burst size for servo #3 to pwmLevel / 2 us
UbSetServoMinimum4(pwmLevel)            // Sets the minimum burst size for servo #4 to pwmLevel / 2 us
UbSetServoMaximum4(pwmLevel)            // Sets the maximum burst size for servo #4 to pwmLevel / 2 us

// Set the servo startup positions (we recommend doing this using the tuning example)
UbSetServoStartup1(pwmLevel)            // Sets the startup burst size for servo #1 to pwmLevel / 2 us
UbSetServoStartup2(pwmLevel)            // Sets the startup burst size for servo #2 to pwmLevel / 2 us
UbSetServoStartup3(pwmLevel)            // Sets the startup burst size for servo #3 to pwmLevel / 2 us
UbSetServoStartup4(pwmLevel)            // Sets the startup burst size for servo #4 to pwmLevel / 2 us

// Set the servo output to a specific burst time (we do not recommend doing this, it ignores set limits!)
UbCalibrateServoPosition1(pwmLevel)     // Sets the PWM burst size for servo #1 to pwmLevel / 2 us
UbCalibrateServoPosition2(pwmLevel)     // Sets the PWM burst size for servo #2 to pwmLevel / 2 us
UbCalibrateServoPosition3(pwmLevel)     // Sets the PWM burst size for servo #3 to pwmLevel / 2 us
UbCalibrateServoPosition4(pwmLevel)     // Sets the PWM burst size for servo #4 to pwmLevel / 2 us

// Get the current servo output burst time
UbGetRawServoPosition1()                // Reads the current burst for servo #1 (divide by 2 for us)
UbGetRawServoPosition2()                // Reads the current burst for servo #2 (divide by 2 for us)
UbGetRawServoPosition3()                // Reads the current burst for servo #3 (divide by 2 for us)
UbGetRawServoPosition4()                // Reads the current burst for servo #4 (divide by 2 for us)

// Setting parameters (before UbInit)
Ubi2cAddress = address;                 // Set the address of the board to use

// Other functions
UbScanForCount()                        // Sweep the I²C bus for the number of available boards
UbScanForAddress(index)                 // Scans the I²C bus for an UltraBorg board, index is which address to return
UbSetNewAddress(address)                // Configure the attached board with a new address
For more complete details see the UltraBorg library reference.
To see the source code for the library or any of the examples see the code listings here.


