UltraBorg - Precision servo control with ultrasonic module support
UltraBorg comes with two special features which should prevent damage to your servos:
Not all servos are the same, so to be safe the limits we set are of a range supported by standard servos.
This matters because the UltraBorg will not be able to make use of the full servo range until you have configured it yourself.
The process of tuning each servo will allow you to use the whole range of the servo, and allow you to set where each servo will move to when powered up.
If you want you can even set the limits to where you want the servo to move to, or swap minimum and maximum to invert the direction of movement.
The above video shows you how to set up Servos on an UltraBorg so they power up in a safe place.
It will allow you to set the limits so we don't try to drive the servos past where their endstops are. If you don't set these, you could potentially damage a servo, or at least you might be using more power, trying to drive them where past where they are happy to sit.
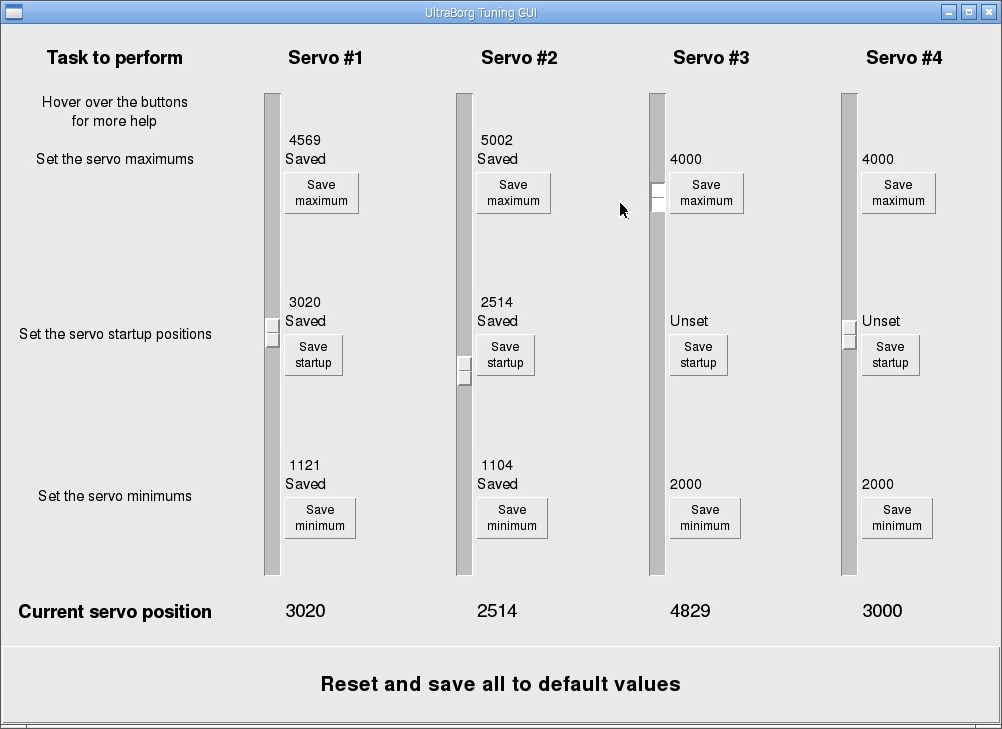
In the GUI, each of the 4 Servos are listed with corresponding 4 sliders. You can hover over each of these buttons to see more help.
You should think of this GUI as superuser sliders where we can potentially tell the servo to do silly things the servo isn't capable of.
Do the same at the other extreme. Move the slider down slowly until it no longer moves and come back a small amount into the movement range, and press the save minimum.
Above the save buttons, the saved position value is shown.
On power up, the Pic microcontroller on the UltraBorg will tell the servos to position to the saved startup position.
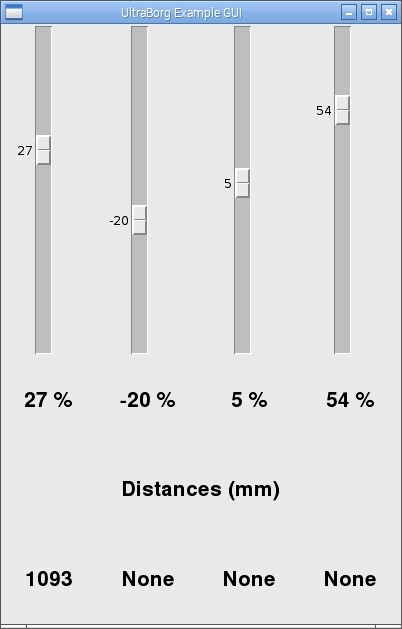
In normal use, you should use the UltraBorg Demo GUI, not the Tuning GUI.
If you do not wish to use the tuning GUI then you can use the serial port version provided for the Arduino.
The UltraBorgTuning sketch is included with the library and example for Arduino, so go ahead and open
Hit the upload button to compile and program the Arduino.
Open the serial monitor, you should be presented with the following:
- Limits to prevent you moving too far
- Powers up the servo to a safe position
Not all servos are the same, so to be safe the limits we set are of a range supported by standard servos.
This matters because the UltraBorg will not be able to make use of the full servo range until you have configured it yourself.
The process of tuning each servo will allow you to use the whole range of the servo, and allow you to set where each servo will move to when powered up.
If you want you can even set the limits to where you want the servo to move to, or swap minimum and maximum to invert the direction of movement.
Raspberry Pi
The above video shows you how to set up Servos on an UltraBorg so they power up in a safe place.
It will allow you to set the limits so we don't try to drive the servos past where their endstops are. If you don't set these, you could potentially damage a servo, or at least you might be using more power, trying to drive them where past where they are happy to sit.
In the GUI, each of the 4 Servos are listed with corresponding 4 sliders. You can hover over each of these buttons to see more help.
You should think of this GUI as superuser sliders where we can potentially tell the servo to do silly things the servo isn't capable of.
Setting the endstops
We can tell the servos to drive past their end stops, so we need to be careful and move the slider slowly. Watch the servo closely as you move the slider slowly upwards to the point where the servo no longer moves. Once it stops, or where you can hear it struggling, come back ever so slightly so we are still in the moving range. When the servo is at the end, but is still in the moving range, press the save maximum button.Do the same at the other extreme. Move the slider down slowly until it no longer moves and come back a small amount into the movement range, and press the save minimum.
Above the save buttons, the saved position value is shown.
Setting the servo to start up position
You can set the endstop position to anywhere within the endstop range. Move the slider to a position between the endstops and click the save startup button.On power up, the Pic microcontroller on the UltraBorg will tell the servos to position to the saved startup position.
In normal use, you should use the UltraBorg Demo GUI, not the Tuning GUI.
Arduino
If you have a Raspberry Pi available we recommend using the UltraBorg Raspberry Pi tuning GUI to configure the limits for simplicity.If you do not wish to use the tuning GUI then you can use the serial port version provided for the Arduino.
The UltraBorgTuning sketch is included with the library and example for Arduino, so go ahead and open
UltraBorgTuning.ino in the Arduio IDE.Hit the upload button to compile and program the Arduino.
Open the serial monitor, you should be presented with the following:
Check for UltraBorg...
UltraBorg connected ^_^
Which servo do you want to tune [1-4] ?
You will need to repeat these steps for each servo you wish to tune:
- Type in the servo number and press ENTER
- We will now hunt for the maximum servo position
- Type in increasing numbers (followed by ENTER) until the servo either stops moving or makes buzzing sounds.
You may move in larger steps than 100, but be careful not to go too far past the servos limit. - When the servo has reached the limit type in decreasing numbers (followed by ENTER) until the servo stops buzzing and is moving again.
The servo movement may be very small at this stage, smaller steps will give a more accurate result. - When you have found the correct place press SENTER to save it as the maximum.
- We will now hunt for the minimum servo position
- Type in decreasing numbers (followed by ENTER) until the servo either stops moving or makes buzzing sounds.
You may move in larger steps than 100, but be careful not to go too far past the servos limit. - When the servo has reached the limit type in increasing numbers (followed by ENTER) until the servo stops buzzing and is moving again.
The servo movement may be very small at this stage, smaller steps will give a more accurate result. - When you have found the correct place press SENTER to save it as the minimum.
- We will now set the startup position
- Type in a position (followed by ENTER) to move it to a position between the minimum and maximum
- Repeat the above until you are happy with where the servo is to be where it starts from when first powered
- When you have found the place you want press SENTER to save it as the startup position.
- The script will restart now, ready for the next servo
Current settings for servo #1
Minimum: 1100
Startup: 3000
Maximum: 5120
Press the reset button at any time to abort the process.